
Hello! Today I’m happy to share the method I use for cross hatch quilting and straight line quilting. These are the two methods I use most when doing my own quilting, and they are simple to do, even if you’re a beginner quilter. While this post was originally published in September 2016, I’ve updated it with a brand new video tutorial I filmed in June 2021 (be sure to read to the end for the video link).

Cross Hatch Quilting
Cross hatch quilting is simple and classic and works well with a lot of different
designs. The technique I use is the same one I use for my straight line quilting, so you’ll be able to do both types of quilting after reading this tutorial. Additionally, I have a video you can watch where you can also see each step of this process.
To get started you’ll need your finished quilt front, batting and backing. For my tutorial I’m demonstrating with fabric I’m quilting for a bag, and so I have the bag front, the bag lining, and the Soft & Stable which I’m using instead of batting. (This technique works just as well with batting and Soft & Stable).
First Steps
I begin by pressing the top, bottom, and batting. This seems to help keep things flat.
Next, you’ll want to mark your beginning quilting line somewhere near the middle of your fabric. Starting in the middle of the fabric helps you avoid puckering of the fabrics. I like to use a Clover Chaco Liner, White![]() for marking my quilting lines on medium and dark fabrics. The Chaco Liner produces a thin, clear line, and the chalk easily wipes away when you‘re finished. For working with lighter fabrics, the Chaco Liner is also available in other colors.
for marking my quilting lines on medium and dark fabrics. The Chaco Liner produces a thin, clear line, and the chalk easily wipes away when you‘re finished. For working with lighter fabrics, the Chaco Liner is also available in other colors.
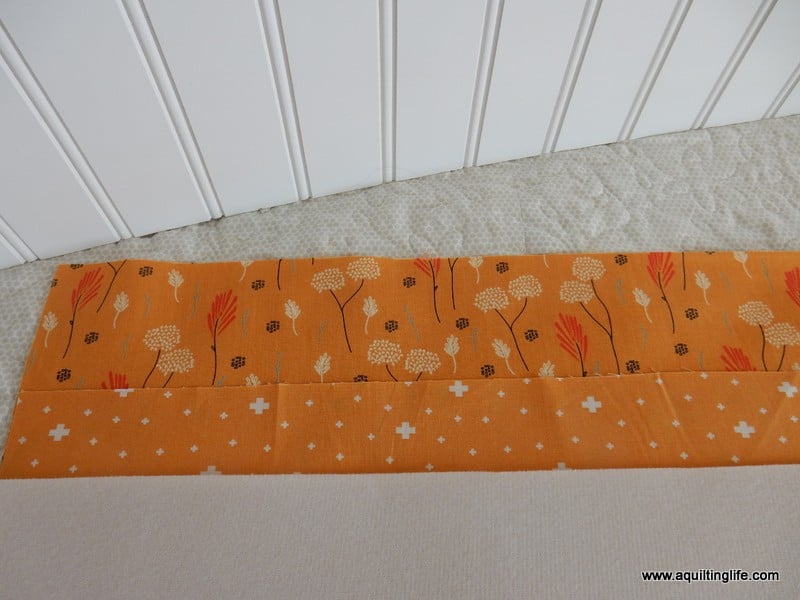
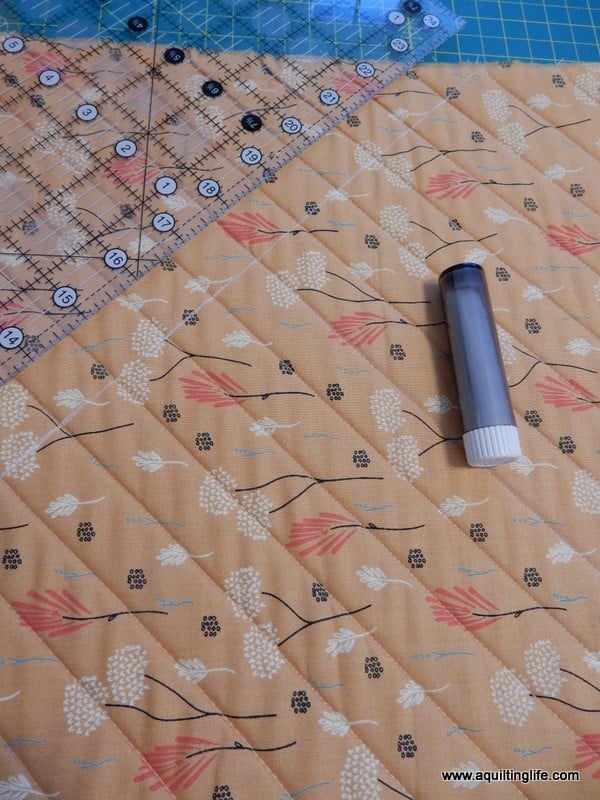
To mark the line for cross hatch quilting, line up the 45 degree line on your acrylic ruler with the bottom straight edge of your fabric and draw a line using the chalk marker. I like to mark and quilt on the front side of my project since I can see what is happening at all times with the front.
After marking the fabric, layer the top, batting, and backing. I like to press the three layers together.

Baste the Layers Together
You might also want to use a light coating of a good quality basting spray if you are working with batting and are working on a larger project. I recommend Odif Usa 505 Spray and Fix Temporary Fabric Adhesive, 10.93 oz.![]() I will generally place a sheet or towel underneath my project when spraying to avoid getting any over spray on flooring or furniture. Spray the bottom of the batting before adhering it to the backing fabric. Then spray the top of the batting before adhering to the front of the quilt.
I will generally place a sheet or towel underneath my project when spraying to avoid getting any over spray on flooring or furniture. Spray the bottom of the batting before adhering it to the backing fabric. Then spray the top of the batting before adhering to the front of the quilt.
When using Soft & Stable a fabric adhesive spray isn’t usually necessary as the Soft & Stable tends to adhere naturally to the fabric. I do like to iron the top, Soft & Stable, and backing together before I begin stitching. Additionally, when I’m quilting a smaller piece using batting, I will generally just use safety pins to baste the layers together.
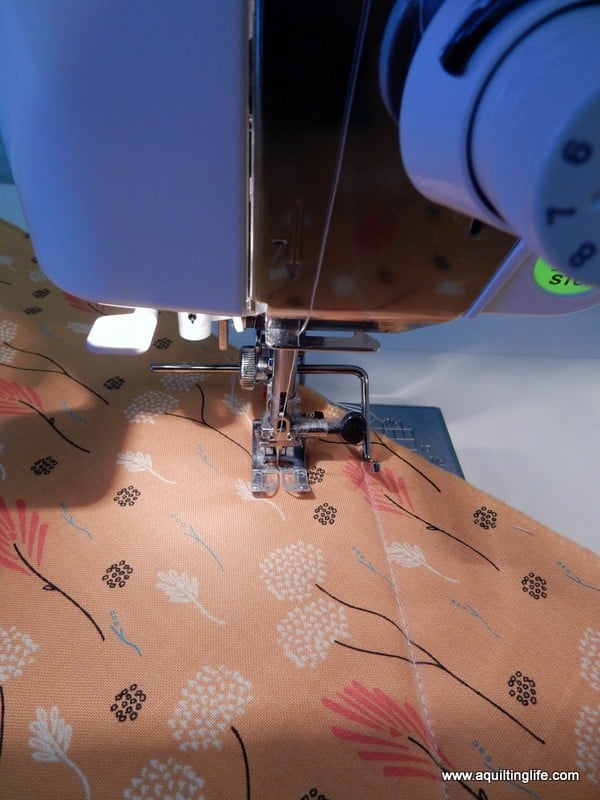
In the photo below you will also notice a metal quilting bar. This is a tool that comes standard with most machines and is the biggest help in any type of straight line quilting. The left side of the bar pictured below fits through an opening on the foot holder. The right side of the quilting bar will rest on the fabric.

Lengthen Your Stitch
Before stitching, consider lengthening your stitch. I like to lengthen the stitch on my machine to a 3.5 or 4 length. You may also need to use a walking foot for this type of quilting. My machine has a built in dual-feed walking feature, so I can sometimes get away without using the walking foot; however, when I’m really concerned I always put the walking foot on first.
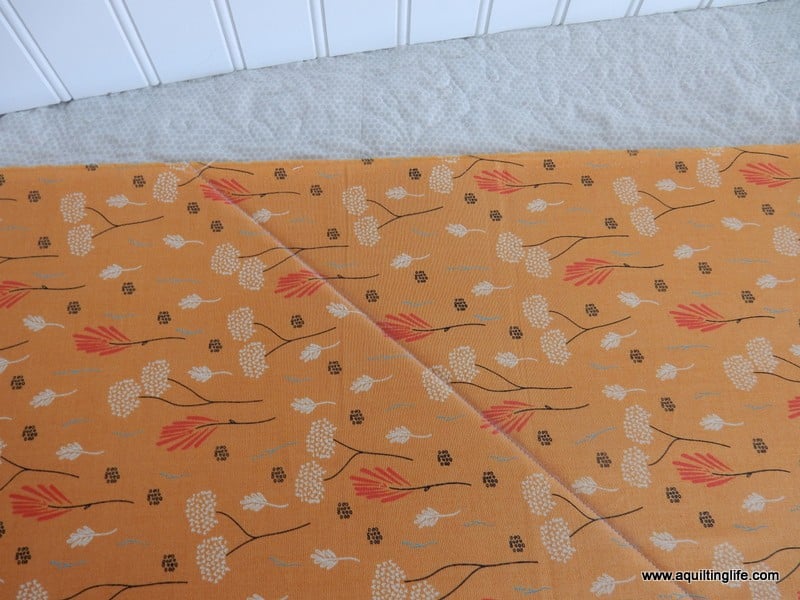
Stitch directly on the drawn line.
Use a Quilting Bar
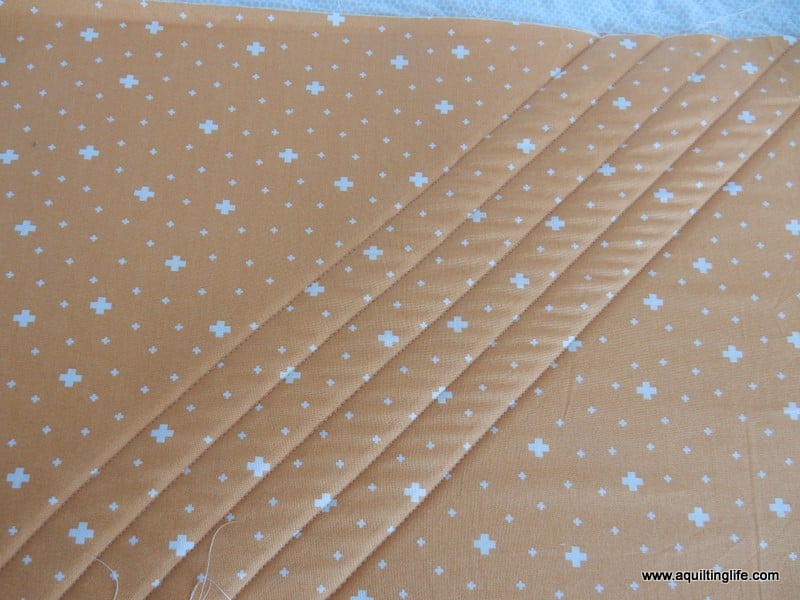
Now is where the quilting bar comes in handy. Adjust the quilting bar so that the right side of the bar (resting on the fabric in the photo below) is the same distance from the needle as the desired space between quilting lines. For my example I used 1″ crosshatch quilting, so I used a ruler to measure and adjust the quilting bar. Trace the beginning line of stitching with the quilting bar while stitching the next line. Sew from one end of the fabric to the other. Each row of stitching will be sewn with the quilting bar lined up on top of the previous line. This keeps the stitching lines exactly the same width.
(If you don’t have a quilting bar you can use painter’s tape or use the chalk marker to draw all of your quilting lines).
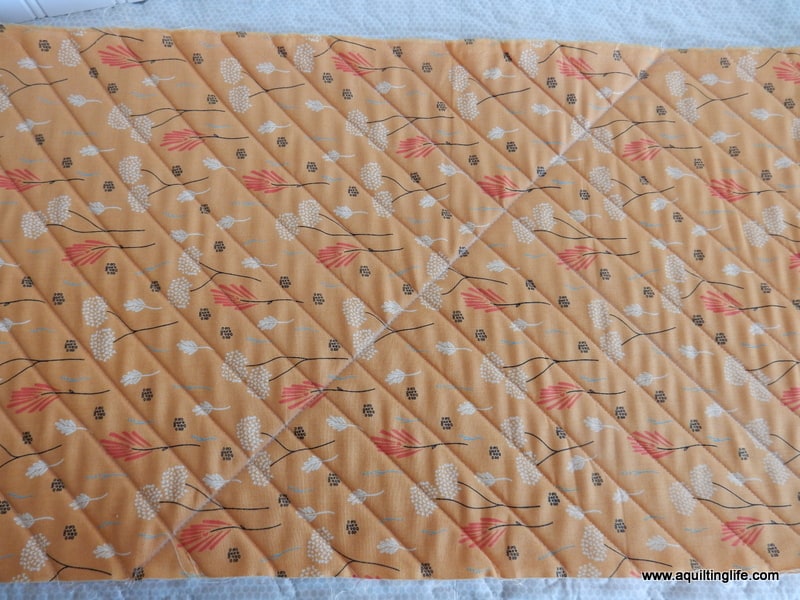
This is the view from the back. Continue stitching as directed above until you reach the end of the fabric. Then you’ll need to flip the fabric to stitch the other side (we started stitching in the middle of our fabric and will complete all of the lines on one side of the first seam before beginning to sew on the other side of that first seam).
Mark the Perpendicular Quilting Line
When all of the straight lines in one direction are finished, you’ll need to make one more mark using your acrylic ruler and Chaco Liner. Mark another 45 degree line perpendicular to the previous lines of stitching. Again, make this mark close to the center of the quilted piece.
Just as in the first steps, the first line of stitching going in the other direction will be sewn right on top of the drawn line. Then, the stitches on either side of the first seam will be sewn using the quilting bar as a guide.
When you’re finished stitching you’ll have a beautifully crosshatched quilt or fabric sandwich!
Tips for Preventing Puckering
- Use care when putting the layers together. You may want to try using painter’s tape to tape the backing to a table or tile/wood floor. Use basting spray on the front and back of the batting as directed above. Finally, you may want to pin baste with safety pins to keep the fabrics even more secure and prevent shifting while you are quilting.
- My number one tip for preventing puckering is to use a walking foot. Puckers happen when the top and bottom fabrics aren’t moved evenly across the feed dogs. By using a walking foot, nearly all problems can be eliminated.
- Finally, occasionally check the back of the quilt while you are working to make sure nothing has moved. If you begin quilting in the middle as explained above, you will also be able to check the back when you turn the piece to begin quilting the other half.

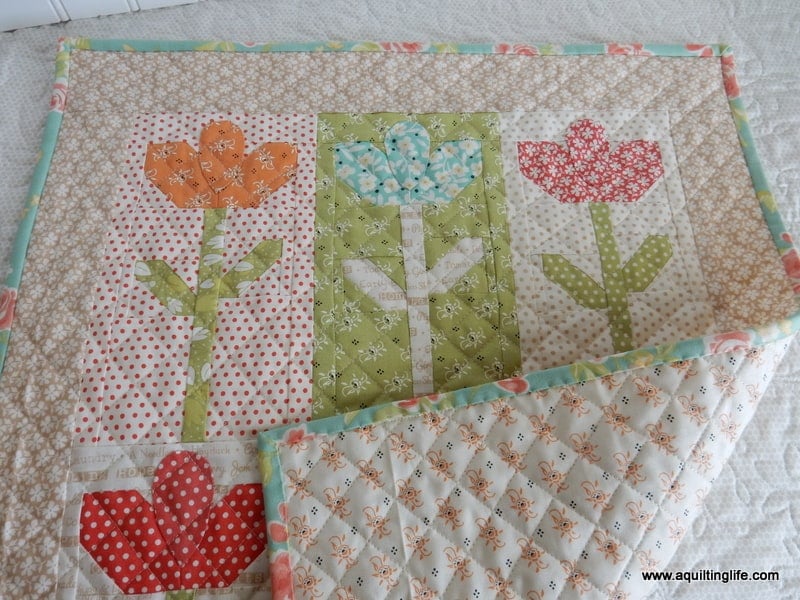
One of my favorite wall hangings is one I quilted with crosshatch quilting…so I thought I’d share it, too. I love the way the crosshatch looks on the backing as well!
I hope this tutorial has been helpful…crosshatch and straight line quilting are probably the easiest methods to use when quilting smaller projects like pillow tops, wall hangings, place mats, and table runners.
Cross Hatch Quilting Video
Watch my Cross Hatch Quilting video above, or go here to watch it on YouTube.
Happy quilting…and thanks so much for stopping by!

Hildy says
Great tutorial thanks for sharing with us!
deb* says
This was very clearly written and gives me courage to try a small project–thank you!
sandi collins says
Thank you for the tutorial and inspiration
HospiceNP says
This looks great and I think I could do it on a small project. However I tried with a larger piece, about 54×54 inches, and the backing puckered and stretched on the bias. How do you prevent that?
Margaret says
Thanks for another great tutorial, Sherri. Another suggestion for quilting lines or a grid on your quilt, ( this works particularly well with small quilt tops), is to use blue painter's tape instead of marking the lines. It's quick and accurate, and the strips of tape can be used quite a few times.
judyquilts says
Great tutorial! Do you have any hints to prevent skewing and puckering when cross hatching larger pieces?
Little Quiltsong says
Great tips! Thank you for this post. I too love crosshatch quilting – but sometimes I get lazy and just do the diagonal lines one way for my little projects. Crosshatch does put a final special touch to it though!
Tina says
What great information! Thanks so much for posting this. I am going to be sure to give this a try!! I love the crosshatching on your little quilt – perfect!!!
Linda in Calif. says
Thanks for the tutorial and the clear instructions. I was thinking of using this on my queen size quilt. Just on the inner border section – but I saw two comments about puckering with a large quilt. Any thoughts or suggestions?
Angie in SoCal says
That's how I do mine. Yours looks so perfect.
Judy says
You do beautiful cross hatching. I think it's great and will use it for some placemats for our RV. Thank you!!
nlwilson46 says
I can't believe you would post this today. I just set up a quilt for cross hatching. I've done it before but have never used that dreaded attachment. I'm going to now! Right now….looks simple enough. I hope! Thanks for a great tutorial. Very timely I must say.
Libby says
Thank you for this tutorial !!!
Cher Merriman says
Thank you for this great tutorial. My machine, which was my mother's originally, does have that gadget but I wasn't sure how to use it. Can't wait to try it now!
Rosemary B❤️ says
thank you Sherri for sharing your extensive knowledge. This one makes me feel brave.
Sally Hurst says
Thank you so much for this information. I have been sewing and quilting for years, and have never used the bar although I have it.
I have been doing way too much work drawing all the lines in. I am eager to try this out!
Patti says
Great tutorial, Sherri! I have a new machine and it has a bar so I'll be sure to use it. I have one question though. Do you sew the lines all in the same direction, say top to bottom and then bottom to top when you do the other side of the midline? I thought it might get twisted doing it that way but your sample doesn't appear to be. Thanks for sharing!
Marjorie Elliott says
Hi Sherri,
I'm curious about why you have your walking foot guide on the right (inside the hoop of your machine). I always put mine on the left so it isn't getting tangled on the bulk of any fabric that's going through the hoop. There is the annoyance of the little bar that adjusts the width of the guide, which I think your method would avoid, but just curious how you ended up with that configuration. Thanks.
Needled Mom says
Great tutorial, Sherri. Thank you.
carolg says
Sherri, have you had any issues with removing the Chaco Marker? The blue and yellow both stained light fabric. I oxy-cleaned them out, and fortunately it was a small project, but I am afraid to use them again. And they marked just perfectly ! A thin, accurate line.
BillieBee (billiemick) says
Love this tute!
Stacy says
Thank you so much for this tutorial! It was very timely for me since I have been wanting to do this and didn't know where to start.
Joys Quiltz says
There has been no answer to the puckering questions. Whenever I do Cross hatching, I make sure to reverse direction with each line. Otherwise, your quilt will be out of square when finished. That means switching sides for the guide each time.
Gmama Jane says
Thank you Joys Quilt for Finally giving some sort of answer to the puckering question. I wish Sheri would check her comments and reply as well to her posts' comments. It would be Very helpful as I have the same problem! Any other suggestions??