

Hello! I hope you enjoy this fast and fun table topper tutorial. It’s perfect for Moda Candy squares or for scraps…

I have had so much fun making this Christmas runner to use for the tutorial photos and have even started another (these runners make the best Christmas gifts).
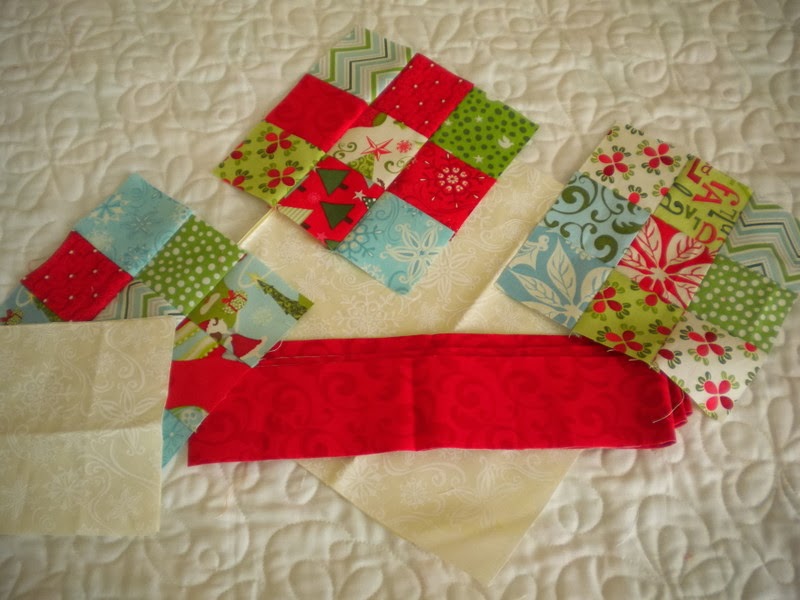
I’m using the smaller version of the pattern for the tutorial. Here is what you’ll need for the small table runner:
- First, make three nine-patch blocks using 2 ½″ squares (you’ll need one Moda candy pack or 27 squares for this step). Your nine-patch blocks will be 6 ½″ x 6 ½″ (unfinished).
- Next, cut one square 10″ x 10″ from your background fabric. Cut this square twice on the diagonal to make your four side-setting triangles.
- Cut two squares 5 ¼″ x 5 ¼″ from background fabric. Cut these squares once on the diagonal to make the four corner triangles.
- Cut two strips of fabric 2″ x width of fabric (not shown in this photo). You can use background fabric or a coordinating print. This is for your borders.
- Cut three strips of fabric 2 ¼″ x width of fabric. This is the red fabric shown in the photo. You will use this to make your binding.
- One piece of batting 18″ x 36″
- One piece of backing fabric 18″ x 36″

Lay out your 9-patch blocks, your side setting triangles (the larger triangles) and the corner triangles. This way you’ll be able to see how you need to put your rows together. Be sure to handle the triangle pieces as little as possible since they have bias edges and can easily stretch.

To sew a side setting triangle to a nine-patch block, line up the 90-degree corner of the triangle with the nine-patch block, right sides together. Sew using a ¼″ seam.

Press your seam allowance towards the setting triangle. You will notice that the triangle extends beyond the top edge of the nine-patch. Don’t worry about this. It is important that they are even along the lower edge as shown in the photo above.
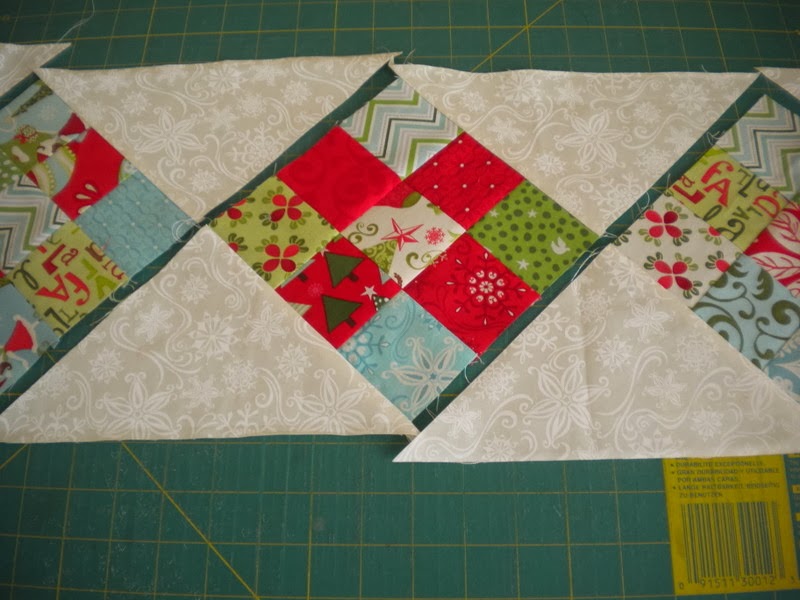
Sew all four setting triangles to the nine-patch blocks. You will notice from the photo above that the end 9-patch blocks each have one setting triangle sewn to them; however, the center 9-patch blocks has a setting triangle sewn on two sides.

Next, begin to sew these three sections together. In the photo above the center 9-patch section has been sewn to one end section.

When all three sections have been sewn together your runner will look like the photo above.

The next step is to sew the corner triangles on to the ends. Center the corner triangle on top of one end of the 9-patch. The corner triangle will extend past both ends of the 9-patch block.

After you have sewn the corner triangle to the end, press out towards the corner triangle. Next you can sew the other corner triangle on and then repeat on the remaining two corners on the other side of your runner.

Your runner will now be rectangular in shape and is ready for some borders.

Measure your runner lengthwise and cut two pieces of your border fabric to that length.

Sew using a ¼″ seam and press out towards the borders. Measure the ends of your runner and cut two pieces of border fabric to that length.

Sew the end border sections to your runner, again pressing out towards the border. Now you are ready to quilt and bind your runner!

You can make your runner longer by making more 9-patch blocks and cutting more side-setting triangles.

You can make your runner in holiday fabrics and in your favorite everyday prints! I’ve made several and love them all!

Thanks so much for stopping by!

Cath says
All lovely but I DO like the fabrics in the first one
Anne D says
Thanks for a great pattern. I made one when you first showed it and it is wrapped under the tree. Trying to decide if I have time to make one for me now.
tpott says
Thanks so much for the great tutorial. I might even have time to make a few before Christmas, you made them look so easy. ;-> Toni Anne
Mad about Craft says
Thank you so much, I am going to make 2 for presents for my neighbours.
Seasons' Greetings!
sewyouquilt2 says
very pretty.
love them and you could also make the back a different holiday for a reversible one.
love it!
AnnieO says
I made several of these last year and they are fast and easy! Great instructions you give there 🙂
WoolenSails says
That came out beautifully. I do need one for my long bureau but right now i just want to finish up the cards and gifts and relax, lol.
Debbie
Sigrid Golnik says
Thanks so much for a wonderful tutorial! I hope to use this in the new year to make some gifts. Love the simplicity – yet beautiful pattern.
Christine S says
Thank you!! I love this 🙂
Sonya says
I LOVE this! Thank you so much for sharing it with us! You are such an inspiration to me 🙂
Patti says
It's just gorgeous malorgeous
Patti says
It's just gorgeous malorgeous
Sandy says
Thanks so much for the tutorial, going to have some fun and make one tomorrow – really need some inspiration!
collectcreatecirculate.com says
Very nice. I think I will be making one of these in the future, so I best pin your link for the lovely tutorial. Happy Holidays
...just Peggy says
Thank you Sherri for the Table runner pattern. I have made 3 of them so go check them out.
I am looking forward to your next 2 1/2" square project.
Pam @ Quilting Fun says
Great table runner!! I am going to whip up a couple as hostess gifts! Fabulous suggestion and fabulous tutorial! Thank you!
handmadeby EvaRose says
Great tutorial, you make it all look so easy. I love the design here, how you turned the squares at 45 degrees, very eye catching. thank you for sharing
MARIA CRISTINA says
Muchas gracias por el tutorial!
El resultado es muy bonito!
SIMPLESEW says
I so needed this so so cute.. I have these minis and a cold, I bet I could do this…. for my 4 DIL before xmas.. so so cute.