

It was a happy Monday today when this sugar cookie bouquet arrived to say “Congratulations” from C&T publishing (thank you so much everyone at C&T)! I have to be honest and let you know that 2 of the cookies are already gone…and they were delicious!
I’ve been sewing and taking some photos for 3 different things I’ve been wanting to share–hopefully I can get them all finished up soon. For today, though, I’d like to share a few thoughts on how I add rod pockets to the backs of my quilts.
If I know I’m never going to hang a quilt I don’t worry about adding a hanging pocket to the back, but if there is any chance I’ll be displaying the quilt at home or somewhere else I like to add the pocket before I bind the quilt.

I really like to have the top seam of the rod pocket sewn to the top of the quilt before I add my binding. That way, when I bring the binding over from the front to hand stitch it to the back of the quilt I can enclose the raw edges of the rod pocket. This makes it so I only need to hand stitch one edge of the rod pocket to the back of the quilt.
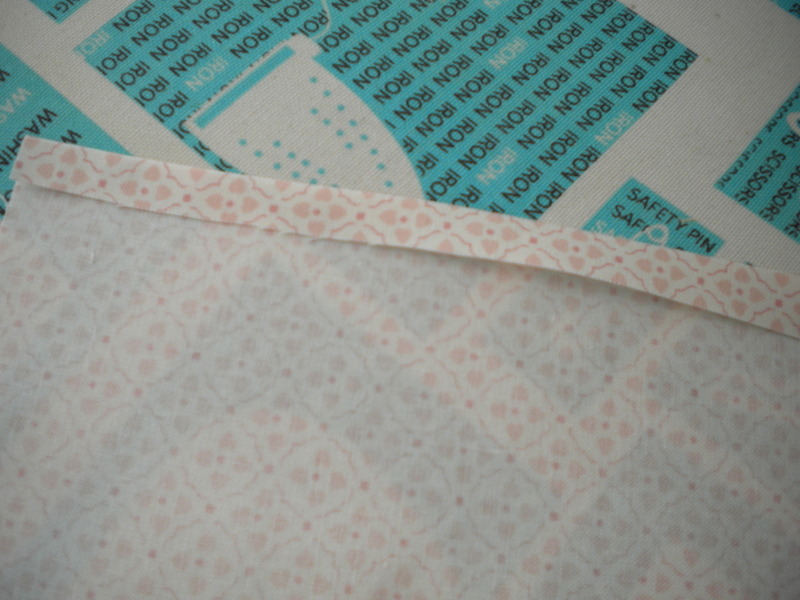

Next, I’ll fold the rod pocket fabric in half, wrong sides together. You can see in the photo above there is the sewn, finished edge on the right. The bottom edge is folded, and the raw edges are at the top.

Next I pin and then baste the rod pocket to the top edge of the quilt. Sometimes I try to match the rod pocket to the backing and other times I’ll use a contrast fabric–it just depends on what I have left over when I finish the quilt. For this quilt, I matched the strip of backing fabric at the top of the quilt. The rest of the backing for this quilt was pieced with left-over layer cake squares.
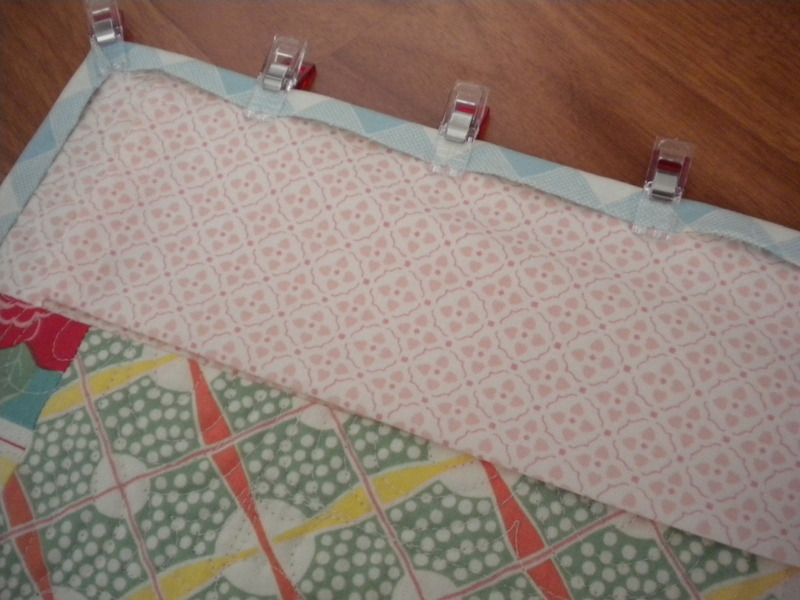
Next I’ll bind my quilt–the binding will completely cover the raw, unfinished edges of the rod pocket.

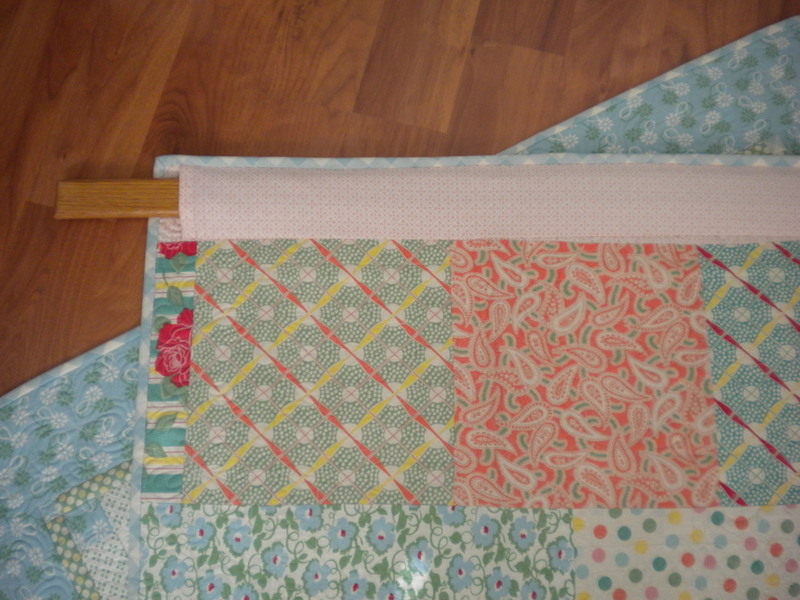
Here is another picture that shows what we have up to this step. The finished quilt is on the botom, and I’ve lifted up the rod pocket. The binding is ready to be hand-stitched at the top of the quilt.

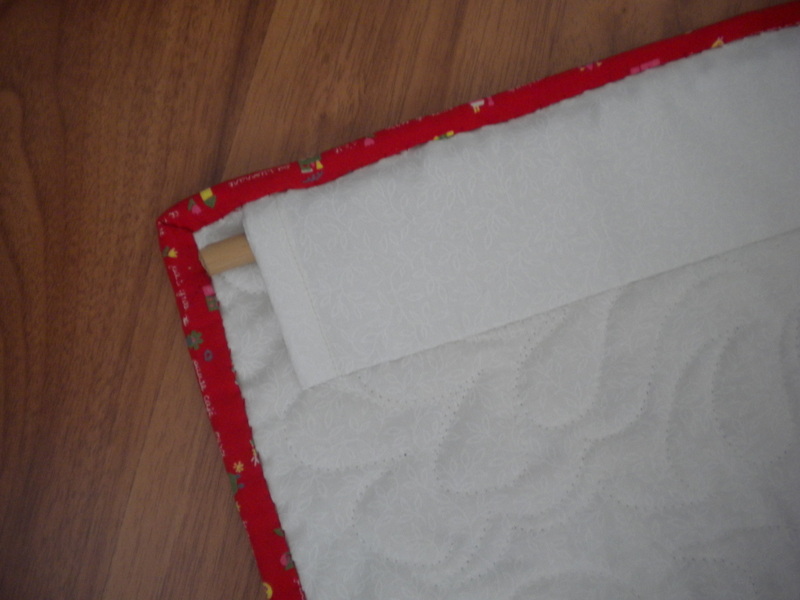
After I’ve hand stitched the binding, it’s time to hand stitch the bottom of the rod pocket to the back of the quilt. I usually pin before sewing to keep the rod pocket from shifting.
When I’m finished I have a rod pocket with all finished edges, and a minimal amount of hand-stitching since the upper edges are enclosed in the binding seam.

When hanging a smaller quilt, I’ll often use two charm squares, folded in half wrong sides together and sewn into the binding seam to create two small pockets for the dowel.
Also, if I don’t want the dowel to show from the front of the quilt, I’ll make sure the rod pocket is far enough in so that there is room for the dowel to extend beyond the pocket and rest on nails.
I hope some of these ideas might help a little…this is the technique my Grandmother taught me, and I’ve been using it for all of my quilts that I plan to hang. Because the rod pocket is made of a folded fabric, it bears the weight of your quilt and puts less stress on the quilt itself.
Thanks so much for stopping by…now I’m off to get some more photos taken for tutorials later in the week! Have a happy Monday!
P.S. My friend Stefanie at LittleLadyPatchwork has a new shipping policy: $5 shipping for all orders up to $24.99 and FREE shipping on all orders over $25! Check out her shop here!

Sheila says
that is a very comprehensive tutorial, thanks for posting. Your friends shop is very sweet, but sadly they are not posting internationally
trish says
Thank you for the rod pocket tutorial. This is great information. I made my first rod pocket the other day. I really enjoyed it. Silly huh? :0)
Thanks for sharing about Little Lady Patchwork shipping. She has nice shop! :0)
trish says
ps. Your cookies look yummy. What a sweet gesture. :0)
Kate says
Thanks for th tips! I have a quilt hanging up using bulldog clips, so it's probably time I fixed that!
Thimbleanna says
Your cookies look delicious. I put rod pockets in the same way — Grandmas know best LOL!
Gransie's Groove says
Thanks so much for the tutorial! I'm going to do this on my next quilt:) Thank you, too, for your inspiration!
Cheryl says
Love that sweet bouquet!!! Thanks so much for the wonderful tutorial.
Michele says
Congratulations! I can't wait to buy your book! WooHoo!! I'll bet those cookies were yummy 😉 Thanks for the sweet tutorial!
Patricia says
Glad you got the cookies and not me because I'm on a massive diet. But then again you deserved them and I can't wait to see your book. I'm sure it will be awesome.
Sandy says
Thanks for the great tute. I have not attached a sleeve yet and this helped for most everyone I may need!
Beverly says
You always have great ideas. That's why I check you blog first every day. AND your topper is still my favorite!!!!
Cheryl says
Clever ideas. Thanks so much for sharing all the different ways we can do this. As well as providing pics examining what you were talking about. I may be making and hanging more quilts in my future.